T.C.’s Complete Guide to Mushroom Liquid Culture

liquid culture syringes with tip caps
Mushroom liquid culture syringes with white mycelium for mycology research

Introduction

If you're interested in mycology research, you've probably heard about liquid culture. Maybe you've seen people talking about it in forums. Maybe you've wondered if you should be using it instead of spore syringes.

Here's the truth: liquid culture is one of the most useful tools in mycology. It's faster than spores, more reliable than multi-spore methods, and gives you consistent results project after project. But what exactly is liquid culture? How does it work? And more importantly, how do you use it without running into problems?

This guide answers all of those questions. Whether you're completely new to mycology or you've been working with mushrooms for years, you'll find practical information you can use right away. By the end of this guide, you'll understand what liquid culture is, why mycologists prefer it, and how to use it successfully in your own research.

Let's get started.

Disclaimer: This guide covers liquid culture techniques for microscopy and mycology research purposes. We focus on proper laboratory methodology, sterility, and quality control practices.

Table of Contents

What is Mushroom Liquid Culture?

white mushroom liquid culture in a jar
Healthy white mycelium growing in mushroom liquid culture jar

Let’s start with the basics.

Mushroom liquid culture is live mushroom mycelium suspended in a nutrient-rich liquid solution. Think of it like mushroom cells floating in food.

The liquid provides nutrients that the mycelium needs to stay alive and grow. When you introduce this liquid culture to a suitable substrate (like sterilized grain), the mycelium quickly colonizes it.

Here’s a simple analogy: If spores are like seeds, then liquid culture is like a cutting from an already-growing plant. The “plant” is already alive and ready to grow. It doesn’t need to germinate first.

The basic components:

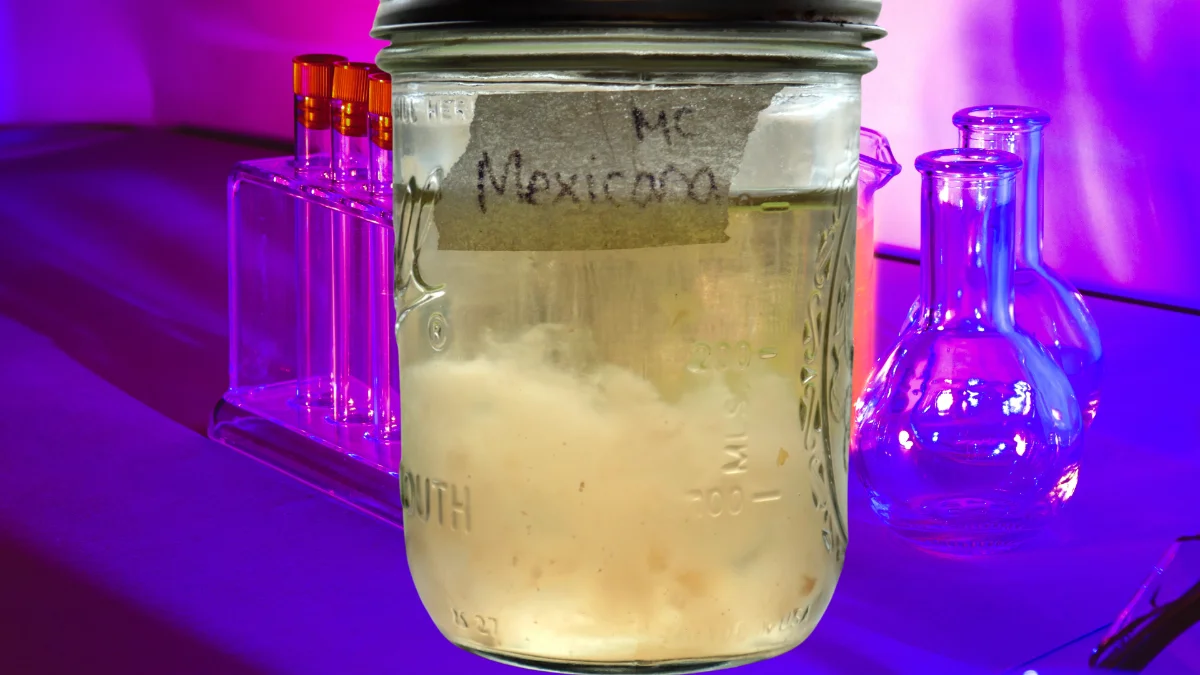
Mycelium: The living fungal network. This is the actual organism you’re working with. In liquid culture, it looks like white, fluffy clouds or wispy strands floating in the liquid.

Nutrient solution: Usually water mixed with a sugar source like light malt extract, corn syrup, or dextrose, or peptone. This feeds the mycelium and keeps it alive.

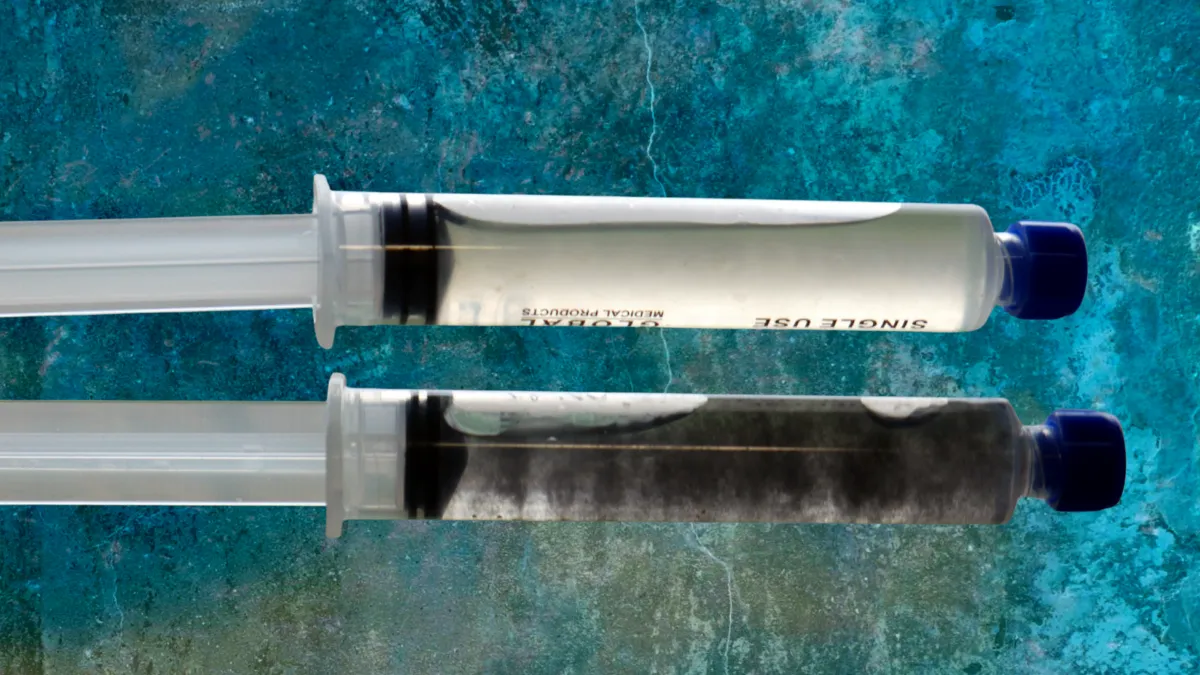
Container: Typically stored in jars with special lids that allow gas exchange, or in syringes with sealed caps for distribution and storage.

The mycelium stays alive in this solution for months when stored properly. It’s ready to use whenever you need

Why Use Liquid Culture? (The Real Benefits)

Mycologists use liquid culture for several practical reasons. Let’s talk about the actual benefits you’ll experience.

Faster Colonization

This is the biggest advantage.

When you inoculate grain or substrate with liquid culture, you’re introducing millions of living mycelial cells all at once. They’re already active and ready to grow.

Compare this to spores. Spores need to germinate first. Then the mycelium from different spores needs to find each other and combine. This process takes time.

With liquid culture, your grain jars can colonize in 5 to 10 days instead of 2 to 4 weeks with spores. That’s a significant time savings.

More Reliable Results

Liquid culture gives you predictable, consistent results.

When you use spores, you’re rolling the dice. Each spore is genetically unique. When multiple spores germinate and combine, you get genetic variation. Sometimes this variation is good. Sometimes it’s not.

With liquid culture, when purchased from a professional vendor, you’re working with a single isolated genetic line. The mycelium behaves the same way every time. You know what to expect.

Better Resource Efficiency

One jar of liquid culture can inoculate dozens of grain jars or substrate containers.

A typical 10ml liquid culture syringe contains enough mycelium to inoculate 5 to 10 quart-sized grain jars. Some researchers stretch a single syringe even further.

You can also expand liquid culture. One jar can be used to create more jars of liquid culture, giving you essentially unlimited supply from a single source.

Quality Control Advantages

Here’s something many people don’t think about: liquid culture can be tested for contamination before you use it.

Professional suppliers test their liquid culture on agar plates to verify it’s clean. You can see the results before you even receive the product.

With spores, you don’t know if they’re contaminated until after you’ve inoculated your grain and waited weeks to see what grows.

Clean liquid culture means clean projects from the start.

Cost-Effective for Multiple Projects

While liquid culture might cost more upfront than a spore syringe, the value is much higher.

One liquid culture purchase can supply multiple research projects. When you factor in time savings, contamination risk reduction, and the ability to expand it, liquid culture often works out cheaper per project.

Liquid Culture vs Other Methods

Let’s compare liquid culture to other common inoculation methods. Each has its place, and understanding the differences helps you choose the right tool for your situation.

Liquid Culture vs Spore Syringes

Comparison of mushroom liquid culture syringe versus spore syringe

Spore syringes contain mushroom spores suspended in sterile water. They’re the most common starting point for beginners.

Speed: Liquid culture colonizes grain in 5 to 10 days. Spore syringes take 2 to 4 weeks.

Genetics: Liquid culture is a single genetic line (consistent results). Spore syringes contain multiple genetics (variable results).

Contamination risk: Liquid culture can be pre-tested for cleanliness. Spores often carry contamination from the mushroom cap, which isn’t sterile.

Use case: Spore syringes are best for starting new genetic lines or when you specifically want genetic diversity, but you have to use agar and need specialized equipment, such as a flow hood or still air box. Liquid culture is better for production and consistent research results. It is also safe to use in open air, without the specialized equipment when injecting through a self healing injection port.

Liquid Culture vs Agar

Agar is a gel medium in petri dishes where you can isolate and verify clean mycelial cultures.

Purpose: Agar is the swiss army knife of mycology. It is used for germination of spores, strain isolation, testing cultures for contamination, and storage of genetics in culture tubes. Liquid culture is primarily used for expanding clean cultures and inoculating bulk substrates. While agar can be used to inoculate bulk substrates, like liquid culture, the two should not be compared, but instead used together.

Skill level: Agar requires advanced equipment such as a flow hood to ensure sterility along with more technique and practice to master. Liquid culture is more straightforward to use for hobby projects and general research purposes.

Speed: Agar takes 1 to 2 weeks to have enough mycelium growth that can be used for inoculation. Liquid culture is ready for research as soon as you have a liquid culture syringe. LC shows visible growth in 2 to 5 days after inoculation.

Relationship: These methods work together. Many mycologists use agar to isolate clean cultures, then transfer to liquid culture for expansion. We’ll cover this process in detail in our comprehensive agar guide (coming soon).

Use case: Use agar when you need to verify genetics, isolate contamination-free cultures, or store genetics long-term. Use liquid culture when you need to inoculate multiple containers quickly.

Liquid Culture vs Grain-to-Grain Transfer

Grain-to-grain (G2G) involves using colonized grain to inoculate fresh sterile grain.

Speed: Both are fast. G2G might be slightly faster since you’re transferring solid colonized material.

Ease of use: Liquid culture is easier to measure and distribute evenly. G2G requires breaking up colonized grain and transferring it, which can be messier. You will require advanced equipment such as a HEPA filtered laminar flow-hood for G2G since you have to open the lids of the sterile grain jars

Storage: Liquid culture stores easily in syringes or jars for months. Colonized grain has a shorter viable window before it dehydrates by the design of the container which requires a hole for gas exchange. A Liquid culture syringe or LC jar remains sealed at all times.

Sterility: Both carry contamination risk if not handled properly, but liquid culture in sealed syringes has far less potential for exposure to contaminants.

Use case: G2G is excellent when you already have clean colonized grain and need to expand quickly, and proper equipment to prevent contamination. Liquid culture is better for long-term storage and precise inoculation amounts, even in open air though a self healing injection port.

How Liquid Culture Works (The Science, Simplified)

Understanding how liquid culture works helps you use it more effectively. Don’t worry! I’ll keep this straightforward.

The Nutrient Solution

Mycelium needs food to survive and grow. In nature, it gets nutrients by breaking down organic matter. In liquid culture, we provide those nutrients in solution.

The most common nutrient is a simple sugar source. Light malt extract is popular because it contains sugars, carbohydrates, proteins, and minerals that mycelium loves. Some people use honey, corn syrup, or Karo syrup instead.

The concentration matters. Too little nutrient and the mycelium grows slowly. Too much creates problems. Bacteria thrive in high-sugar environments. Overfed mycelium also grows slowly because it doesn’t need to search for food while it consumes the excess sugars.

Most liquid culture recipes use 0.40% sugar by weight. That’s 2 grams of light malt extract per 500ml of water. Some mycologists prefer half that amount at 0.20% (1 gram per 500ml).

Your sugar concentration depends on your goal. Higher sugar (0.40%) gives you faster, denser growth but cloudier liquid. Lower sugar (0.20%) produces clearer liquid culture with slower, thinner growth.

How Mycelium Grows in Liquid

When mycelium is introduced to nutrient-rich liquid, it does what it does best: it grows.

The mycelial cells absorb nutrients from the surrounding liquid. They multiply and spread throughout the solution. Within days, you’ll see visible white strands or clouds of mycelium.

As the mycelium grows, it consumes oxygen and produces carbon dioxide. This is why liquid culture containers need gas exchange. Without fresh air, the mycelium suffocates.

The mycelium continues growing until it runs out of nutrients or space. At this point, it’s ready to use. The entire liquid is filled with living mycelial cells.

Why It Colonizes Faster

Think about what happens when you inoculate a grain jar.

With spores, you’re starting from scratch. Each spore must land on a grain kernel, germinate, and start growing. Then different mycelial networks need to find each other and connect. This all takes time.

With liquid culture, you’re introducing thousands or millions of already-growing mycelial cells. They’re distributed throughout the grain jar immediately. Each cell can start colonizing nearby grain right away.

It’s the difference between planting seeds and transplanting seedlings. The seedlings have a head start.

What You Need to Get Started with Liquid Culture

The beauty of liquid culture is that you don’t need much to start using it effectively.

Essential Items

Liquid culture syringe: This is your mycelium source. A standard 10ml syringe with a 16-gauge needle is typical. Look for syringes with sealed tip caps to maintain sterility during storage and shipping.

Substrate to inoculate: Usually sterilized grain in jars (rye, millet, popcorn, or wild bird seed). The grain provides food for the mycelium to colonize. You can also use pre-sterilized grain spawn bags or “all-in-one” bags that contain both grain and substrate.

Sterile technique supplies: At minimum, you need isopropyl alcohol (70% or higher) and a butane torch lighter for flame sterilization. Many researchers work in a still air box for added protection against contamination.

Storage: Refrigeration extends liquid culture shelf life, though it’s not always required. Make sure your refrigerator doesn’t freeze. Never put liquid culture in a freezer.

Optional But Helpful Items

Still air box (SAB): A clear plastic storage tote with arm holes cut in the sides. This creates a protected workspace with minimal air movement, reducing contamination risk during inoculation.

Flow hood: A laminar flow hood filters air and creates a sterile workspace. This is the gold standard for sterile work, but it’s expensive. Most beginners start with a still air box instead.

Agar plates: For testing liquid culture before use. This verifies that your liquid culture is contamination-free. We’ll cover agar testing techniques in detail in our upcoming agar guide.

Additional syringes: For transferring or expanding liquid culture. Having spare syringes lets you divide one batch into multiple containers.

You don’t need to buy everything at once. Start with the essentials and add tools as your skills develop.

How to Use Liquid Culture

Using liquid culture is straightforward once you understand the basic process.

Storage Before Use

Proper storage of mushroom liquid culture syringes and liquid culture jars in refrigerator

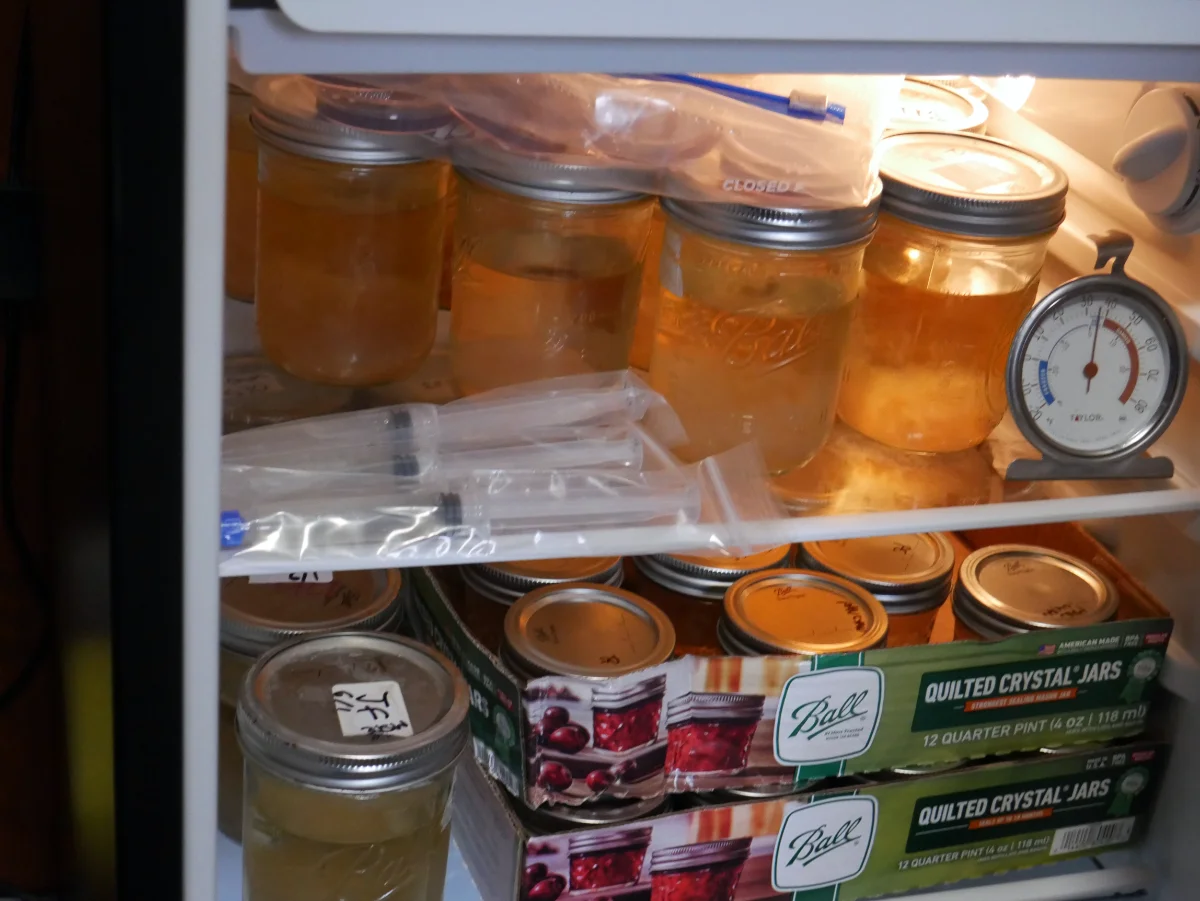
Liquid culture can be stored at room temperature or refrigerated.

Room temperature: Keeps the mycelium more active. Use within 30 to 60 days for best results. Store in a dark place away from direct sunlight.

Refrigerated: Extends viable storage to 6 months or longer. The cold slows mycelial metabolism without killing it. Let refrigerated liquid culture warm to room temperature before use (about 30 minutes).

Important: Never freeze liquid culture. Freezing destroys the mycelial cells. Keep your refrigerator temperature above 32°F (0°C).

Our liquid culture syringes come with sealed tip caps. Always store syringes with the cap on, never with a needle attached. Attach the needle only right before use.

If you’re making your own liquid culture, purchase tip caps when you buy your syringes. Store them the same way.

Preparing for Inoculation

Before you inoculate anything, set up your workspace properly.

Clean your space: Wipe down your work surface with isopropyl alcohol. Remove any items you don’t need. Less clutter means fewer places for contaminants to hide.

Gather your supplies: Have everything within reach before you start. Once you begin sterile procedures, you don’t want to stop and search for something.

Flame sterilize your needle: Hold the needle in a flame until it glows red. Let it cool for 10 to 15 seconds before use. This kills any contaminants on the needle surface.

Shake the syringe: Shake or your liquid culture syringe well to distribute the mycelium evenly throughout the liquid. You want mycelium in every drop, not just settled at the bottom.

Inoculation Technique

Proper sterile technique for inoculating grain jar with liquid culture

The actual inoculation process is simple.

For grain jars:

Flame sterilize the needle and let it cool.

Wipe the injection port on your grain jar lid with alcohol.

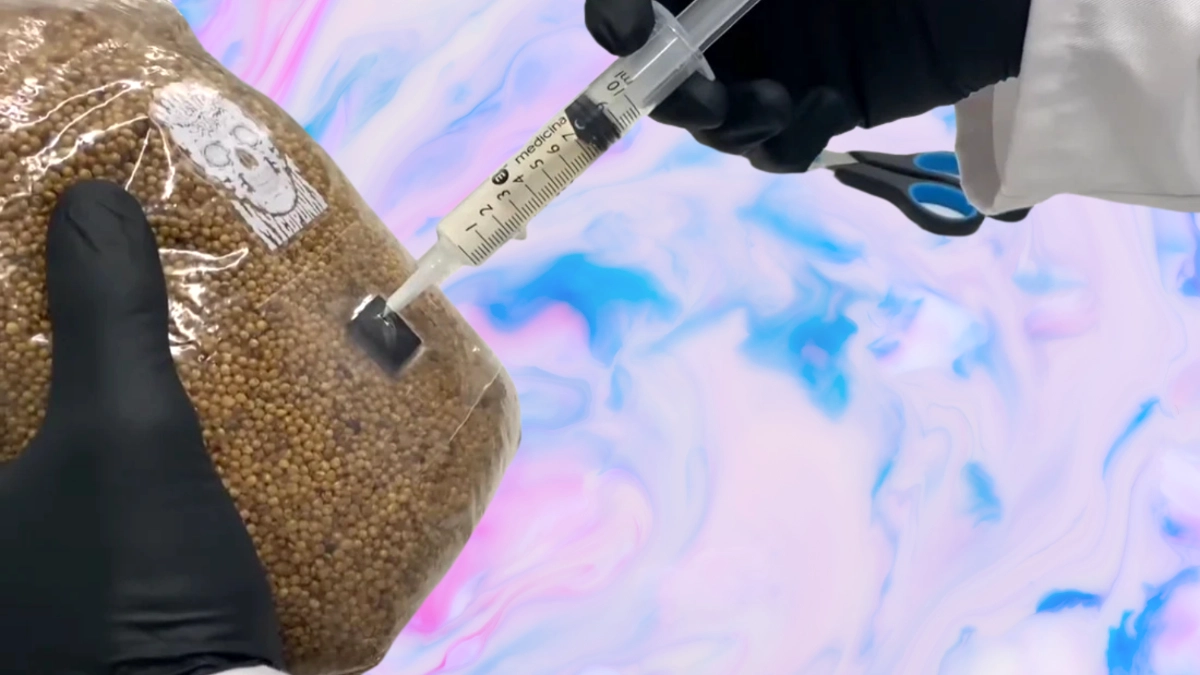
Insert the needle through the injection port.

Inject 1 to 2ml of liquid culture per quart jar. For smaller jars, use proportionally less (0.5 to 1ml for pint jars).

Remove the needle and wipe the injection port with alcohol again.

For injection ports: Most grain jar lids have a self-healing injection port made of high-temp RTV silicone. The needle punctures through it, and the silicone reseals when you remove the needle.

For jar lids without ports: You can inoculate by slightly loosening the lid in a still air box, quickly inserting the needle, injecting, and immediately retightening. NOTE: You cannot do this without a still air box, glove box, or HEPA filtered laminar flow hood

How Much Inoculant to Use

Less is often more with liquid culture.

Standard dosage: 1 to 2ml per quart grain jar is plenty. Some experienced mycologists use as little as 0.5ml per quart with good results.

Why less is better: Too much liquid culture adds excess moisture to your grain. This can lead to bacterial problems or slow colonization. The grain should be moist but not wet.

A 10ml syringe can inoculate 5 to 10 quart jars easily.

After Inoculation

Once your grain is inoculated, store it properly.

Temperature: Room temperature (68 to 75°F or 20 to 24°C) works well for most species. Slightly warmer (75 to 80°F or 24 to 27°C) can speed colonization.

Light: Mycelium doesn’t need light to colonize. Store jars in a dark place or somewhere with indirect light. Direct sunlight can heat the jars enough to harm or kill the mycelium.

Air exchange: Your grain jar lids need gas exchange. This can be a filter patch or a syringe filter sealed into the lid. Gas exchange serves two purposes: it provides oxygen for mycelial growth, and it prevents vacuum formation when you draw liquid culture into a syringe.

Observation: Check your jars daily and gently swirl the liquid to distribute the mycelium. Swirling speeds up colonization. You can swirl by hand once or several times per day, or use a magnetic stir bar with a stir plate. You should see white mycelial growth starting within 2 to 5 days. Full colonization typically takes 5 to 10 days depending on species and conditions.

Quality Control: Why Testing Matters

Quality control agar test showing clean mushroom liquid culture

Here’s something many beginners don’t think about until it’s too late: contamination ruins everything.

You can do everything right, perfect sterile technique, properly sterilized grain, correct storage temperature. But if your liquid culture is contaminated from the start, your project fails before it begins.

This is why quality control matters.

The Contamination Problem

Contamination is invisible at first.

A liquid culture jar might look perfectly clean. Clear liquid, white mycelium, no weird smells. But it could contain millions of bacterial cells or mold spores just waiting to take over when you inoculate your grain.

Once you introduce contaminated liquid culture to your grain, the contamination spreads. By the time you notice (usually 1 to 2 weeks later), you’ve wasted time, materials, and effort.

Even worse, you might not realize the liquid culture was the problem. You might blame your grain preparation, your sterile technique, or bad luck.

How Liquid Culture Gets Contaminated

Contamination enters liquid culture in several ways:

From the source: If you start with contaminated spores or agar, your liquid culture inherits that contamination.

During preparation: Poor sterile technique when making liquid culture introduces bacteria or mold.

Through improper storage: Damaged seals, temperature fluctuations, or compromised containers let contaminants in.

During use: Contaminated needles or non-sterile inoculation practices can introduce contamination.

The most common source is the starting material. Spores, in particular, often carry contamination because they come from the mushroom cap, which is not a sterile environment.

Professional Testing vs DIY

There are two approaches to quality control.

Professional testing: Reputable liquid culture suppliers test their products on agar before shipping. They inoculate agar plates with a sample of the liquid culture, incubate them, and verify that only clean, healthy, and vigorous mycelium grows (no bacteria, no mold).

This testing happens in controlled laboratory conditions. The results are documented. Some suppliers even share these results publicly, so you can see proof of quality before you buy.

DIY testing: You can test liquid culture yourself at home using agar plates. This requires some additional equipment and knowledge of what clean growth looks like versus contamination.

Testing takes time (5 to 7 days for results) but saves you from bigger problems later. We’ll cover detailed agar testing procedures in our comprehensive agar guide.

Why Buy Pre-Tested Liquid Culture

This is where professional liquid culture really shows its value.

When you purchase liquid culture that’s been tested and verified clean, you’re buying confidence. You know before you even start that your inoculation will succeed (assuming you use proper technique).

You’re also buying time. Instead of spending weeks isolating clean cultures from spores, testing them on agar, and then making liquid culture, you receive ready-to-use culture that’s been through quality control.

For many researchers, especially those newer to mycology, this is worth the investment. One contaminated batch can waste more money in ruined grain and time than a quality liquid culture costs.

At Thick Cultures, we test our master cultures monthly and verify every batch on agar before shipping. You can see our testing results in our Quality Control Center, where we document the quality control testing of our products.

Making vs Buying Liquid Culture: An Honest Comparison

Can you make your own liquid culture? Absolutely. Should you? That depends on your situation.

Let me give you an honest breakdown of both approaches.

The DIY Path

Making liquid culture yourself involves several steps and some upfront investment.

Starting from spores (the complete process):

You might think you can just inject spores directly into liquid culture. Technically you can, but here’s the problem: spores are often contaminated.

Spores come from the mushroom cap, which isn’t sterile. They often carry bacteria or mold contamination. If you inoculate liquid culture with contaminated spores, you get contaminated liquid culture.

The proper method is more involved:

First, you inoculate water agar with spores. Water agar contains no nutrients, only agar and water. Contamination doesn’t grow well without nutrients, but healthy mycelium does. This gives you a clean starting point.

Next, you watch for mycelial growth on the water agar. When you see clean mycelium, you cut out a small piece and transfer it to nutrient agar (agar with food). You might need to do several transfers, isolating the cleanest growth each time, until you’re confident you have a contamination-free culture.

This isolation process takes 3 to 4 weeks. Then you can finally inoculate liquid culture with your verified clean culture.

We’ll cover this entire process in detail in our upcoming comprehensive agar guide, including how to identify contamination, proper transfer techniques, and isolation strategies.

What you need:

  • Pressure cooker or instant pot (for sterilizing liquid culture medium)
  • Glass jars with modified lids (for gas exchange)
  • Nutrient ingredients (light malt extract, corn syrup, or honey)
  • Sterile technique supplies (still air box/HEPA filtered flow hood, alcohol, lighter)
  • Agar Agar
  • Petri dishes (for isolation and testing) Time and patience (the whole process takes 4 to 6 weeks from spores)

Cost breakdown:

If you don’t have equipment yet, expect to invest $200 to $500 for a basic setup. Pressure cookers alone cost $90 to $350 depending on the brand and quality. Add jars, lids, filters, agar supplies, and ingredients. Costs could exceed $1,000 If you are buying a HEPA filtered laminar flow hood.

After the initial investment, each jar of liquid culture could cost $2 to $5 in materials.

Time investment:

  • Preparing liquid culture medium: 30 to 60 minutes
  • Sterilization: 45 minutes (15 minutes at pressure + 30 minutes heat-up/cool-down)
  • Inoculation: 15 to 30 minutes
  • Waiting for colonization: 1 to 2 weeks
  • Testing on agar: 5 to 7 days
  • Total time from spores to verified liquid culture: 4 to 6 weeks

Skill requirements:

You need to learn proper sterile technique. This takes practice. Expect contamination failures when you’re starting out. Most people contaminate at least a few batches before they get it right.

You also need to learn to identify contamination on agar, proper agar transfer techniques, and how to isolate clean cultures.

The Buying Path

Purchasing liquid culture from a professional supplier is straightforward.

What you get:

Pre-made liquid culture in sterile syringes, typically 10ml per syringe with a 16-gauge needle. Syringes come with sealed tip caps that maintain sterility during storage and shipping.

The culture is already colonized and ready to use. Professional suppliers test their cultures on agar to verify cleanliness before shipping.

Cost:

Quality liquid culture syringes typically cost $15 to $30 depending on the species and supplier. Some specialty or rare genetics cost more.

This might seem expensive compared to making your own, but remember: you’re buying 4 to 6 weeks of laboratory work that’s already been completed.

Time investment:

Zero. You receive ready-to-use liquid culture. From order to inoculation takes days instead of weeks.

Skill requirements:

Basic sterile technique for inoculation. Much less skill required than making liquid culture from scratch.

The Honest Truth

Here’s what most people don’t tell you: making contamination-free liquid culture is harder than it looks.

Even experienced mycologists deal with contamination. The process requires attention to detail, proper equipment, and a good understanding of sterile technique. When you’re starting out, expect failures.

For beginners, buying tested liquid culture often makes more sense. You skip the learning curve and the equipment investment. You get straight to your actual research instead of spending weeks on preparation.

For experienced mycologists with proper equipment, making liquid culture is cost-effective once you have clean starter cultures. But you still need to buy something to get started (either liquid culture or clean agar cultures).

There’s no wrong choice here. It depends on:

Your experience level Your available time Your equipment budget Your research goals Whether you enjoy the laboratory process or just want results.

Many researchers do both. They buy tested liquid culture to start projects quickly, and they also maintain their own liquid culture for ongoing work. This gives you the best of both worlds.

Common Questions About Liquid Culture

Let’s address some questions that come up frequently.

How long does liquid culture last?

Properly stored liquid culture stays viable for months.

At room temperature in a sealed syringe: 30 to 60 days typically, sometimes longer depending on species and storage conditions.

Refrigerated: 6 months to 1 year. Some researchers report longer viability, but effectiveness may decline over time.

The mycelium slowly consumes available nutrients and produces metabolic waste. Eventually, this waste buildup and nutrient depletion affect viability.

For best results, use liquid culture within 3 to 6 months of production. Store it properly and you’ll have reliable results.

[For more detailed storage guidelines and shelf life information, see our complete guide on liquid culture storage and viability – link to be added when that article is created]

Can you use liquid culture more than once?

This depends on what you mean.

Using one syringe for multiple inoculations: Yes, absolutely. A 10ml syringe can inoculate 5 to 10 quart jars. Each time you use it, flame sterilize the needle between inoculations to prevent cross-contamination.

Expanding liquid culture (making more from existing): Yes, you can use liquid culture to inoculate fresh sterile liquid culture medium. This lets you create an essentially unlimited supply from one original source.

Reusing a jar after it’s empty: No. Once a jar of liquid culture is used up, you don’t add fresh medium to the same jar. The metabolic waste from the first batch will contaminate any new batch. Start with a fresh, sterilized jar.

[For detailed instructions on expanding and maintaining liquid culture, see our guide on liquid culture maintenance – link to be added when that article is created]

What if my liquid culture looks weird?

Trust your instincts. If something looks off, it probably is.

Normal variations include:

  • White mycelium in various densities (fluffy clouds or dense clumps).
  • Slight amber or yellow tint to the liquid (from nutrients).
  • Some sediment at the bottom (settled mycelium or nutrients).

Warning signs include:

  • Any color other than white in the mycelium (green, pink, orange, black).
  • Foul or sour smells.
  • Excessive cloudiness.
  • Slimy or stringy texture Visible mold growth.

When in doubt, test a small amount on an agar plate. If only white mycelium grows with no discoloration or other growth, your liquid culture is clean.

[For a comprehensive visual guide to identifying contamination, including photos and detailed descriptions, see our guide on how to tell if liquid culture is contaminated – link to be added when that article is created]

Do different mushroom species need different liquid culture recipes?

Most species work fine with the same basic recipe (water with 0.40% light malt extract, or 2 grams to 500ml water).

Some mycologists adjust recipes for specific species:

Gourmet species (oyster, shiitake) sometimes prefer higher nutrient concentrations. Some species benefit from additional supplements like nutritional yeast or peptone. Cold-loving species may need storage at cooler temperatures.

But for most research purposes, a standard liquid culture recipe works across many species.

[For specific liquid culture recipes including variations for different species, see our liquid culture recipes guide – link to be added when that article is created]

Next Steps: Deepening Your Knowledge

This guide covers the fundamentals of liquid culture, but there’s always more to learn.

Recommended Learning Path

If you’re new to liquid culture, here’s a good progression:

Start here: Understand what liquid culture is and why it’s useful (you just did this).

Next: Learn proper sterile technique. This is the foundation for all successful mycology work. [See our complete guide to sterile technique and aseptic procedures – link to be added when that article is created]

Then: Learn to identify contamination. Know what problems look like so you can spot them early. [See our guide on contaminated liquid culture identification – link to be added when that article is created]

After that: Learn proper usage techniques. Understand how much to use, when to use it, and how to store it. [See our guide on using liquid culture syringes – link to be added when that article is created]

Advanced: Learn agar techniques for testing and isolation. This takes your skills to the next level. [See our upcoming comprehensive agar guide – link to be added when that content is created]

Additional Resources in This Series

We’re building a complete library of liquid culture resources. Here are the guides we’re creating:

Fundamentals:

  • What is liquid culture and how does it work? (you are here)
  • Liquid culture vs other inoculation methods
  • Understanding liquid culture storage and shelf life

Practical Techniques:

  • How to use liquid culture syringes
  • How much liquid culture to use
  • Breaking up and mixing liquid culture
  • Liquid culture inoculation methods

Making Your Own:

  • Liquid culture recipes and formulas
  • Equipment needed for making liquid culture
  • Step-by-step liquid culture preparation
  • Sterilization and pressure cooking procedures

Quality Control:

  • How to tell if liquid culture is contaminated
  • Testing liquid culture on agar
  • Quality control best practices
  • Preventing contamination

Troubleshooting:

  • Common liquid culture problems and solutions
  • Why liquid culture fails and how to fix it
  • Liquid culture colonization timelines
  • Storage and viability issues

Each guide goes deep on its specific topic. Together, they form a complete education in liquid culture methodology.

Final Thoughts

Liquid culture is one of the most practical tools in mycology research.

It’s faster than spores. It’s more consistent than multi-spore inoculations. It’s easier to use than many advanced techniques. And when you start with quality, tested liquid culture, it’s reliable.

Whether you decide to make your own or purchase from a professional supplier, understanding how liquid culture works helps you use it successfully.

The key is starting with clean cultures and maintaining proper sterile technique. Get those two things right, and liquid culture will serve you well in your research projects.

Remember: contamination is your biggest enemy. Invest in quality starting materials, practice good sterile technique, and test your cultures when possible. These habits prevent problems before they start.

If you’re just getting started with liquid culture, don’t overthink it. Start simple. Use tested liquid culture from a reliable source. Focus on your sterile technique. Watch your grain jars colonize in 5 to 10 days instead of weeks.

As you gain experience, you can expand into making your own cultures, working with agar, and exploring more advanced techniques. But the fundamentals stay the same: clean cultures, sterile technique, and patience.

Good luck with your mycology research. Take your time, stay sterile, and enjoy the process.

Is liquid culture better than spore syringes?

Liquid culture and spore syringes serve different purposes. Liquid culture colonizes faster (5-10 days vs 2-4 weeks), gives more consistent results, and can be tested for contamination before use. Spore syringes are better for starting new genetic lines or when you want genetic diversity. For most research applications, liquid culture is more reliable and efficient.

For a quart-sized grain jar, use 1 to 2ml of liquid culture. Some experienced researchers use as little as 0.5ml per quart with good results. Less is often better because too much liquid culture adds excess moisture to your grain, which can cause problems.

While technically possible, it’s not recommended. Spores often carry contamination from the mushroom cap. The proper method is to first inoculate water agar with spores, isolate clean mycelium through several transfers, and then use that verified clean culture to inoculate liquid culture. This process takes several weeks but ensures contamination-free results.

Properly stored liquid culture can last 6 months to 1 year in a refrigerator. Make sure your refrigerator temperature stays above 32°F (0°C). Never freeze liquid culture as this destroys the mycelial cells. For best results, use liquid culture within 3 to 6 months of production.

Contaminated liquid culture shows unusual colors (green, pink, orange, or black), produces off smells (sour, rotten, or foul), appears excessively cloudy, or has stringy slime like growth. Clean liquid culture should have white mycelium in mostly clear or slightly amber liquid. For a detailed visual guide, see our article on identifying contaminated liquid culture.

Yes, if you’re making liquid culture from scratch. The nutrient solution must be sterilized under pressure (15 PSI for 15-20 minutes) to kill all contaminants. You cannot reliably sterilize liquid culture medium with boiling water alone. An instant pot can work as an alternative to a traditional pressure cooker.

Liquid culture and grain-to-grain transfers are both effective methods with different advantages. Liquid culture is easier to measure, stores longer, and distributes more evenly. Grain-to-grain is slightly faster and works well when you already have clean colonized grain. Many researchers use both methods depending on their specific situation.

Good liquid culture has white mycelium, mild earthy smell, and mostly clear liquid. Test it on an agar plate: if only white mycelium grows with no discoloration or contamination, your liquid culture is viable. If it smells off, shows unusual colors, or grows contamination on agar, it’s no longer good.

Yes, gently shake or swirl your liquid culture syringe before use to distribute the mycelium evenly throughout the liquid. You want mycelium in every drop you inject, not just settled at the bottom.

Room temperature (65-75°F) works for short-term storage (30-60 days). Refrigeration (36-40°F) extends storage to 6+ months. Never freeze liquid culture. If refrigerated, let it warm to room temperature for about 30 minutes before use.

Possibly, but viability declines over time. Test it on an agar plate first. If healthy white mycelium grows with no contamination, the culture is still viable. However, colonization times might be slower than with fresh liquid culture. For best results, use liquid culture within 6 months of production.

Some cloudiness is normal before and right after inoculation. As the mycelium grows, it clears the liquid. If the liquid stays uniformly cloudy and milky even after mycelium has grown, this usually indicates bacterial contamination. Clean liquid culture becomes clearer as it colonizes, showing individual mycelial strands rather than uniform haziness.

Author Information

JOIN US

Join our Subreddit, Discord, Instagram and TikTok to chat, ask questions about mushrooms, and get exclusive offers on our products! I frequently do giveaways of our liquid cultures to benefit the community!